Working with Lists
An iSite List is a container where you put data. At the most basic level, a List resembles a table in a traditional database, but in iSite, it is more complex than that.
Unlike a traditional database where the table defines what data you store in each row, each item in an iSite List has a schema defined by the type of content the item represents.
Each List has one or more columns attached (similar to Custom Attributes), and it is really the column type that decides how the item appears, behaves, and what data or fields an item contains. For example, you can have a "Contact" item containing details like name, address, email, phone number, and so on, and you can have a "Task" item, which contains a task description, deadlines, dependent tasks, and so on.
An iSite List simply stores items like a container, and the items are themselves responsible for presenting the user with the required fields for creating, editing, and displaying data.
Availability
Any iSite User has the ability to view iSite Lists. Lists security is managed at the List level by the List developer.
Navigation
Global Navigation Bar > Lists
List Item Maintenance Functions
The following functions are available when performing List Item Maintenance
- Viewing a List Item
- Adding a new List Item
- Editing an existing List Item
- View and Manage History for an Existing List Item
- Moving List Items
- Importing List Items
- Exporting List Items
- Deleting List Items
Properties of a List Item
A List Item has the following basic properties:
- Title
- Record ID
- Creation Date
- Created By
- Last Update Date
- Last Update By
 Additional properties may be displayed as configured by the List developer.
The Items List
The Items List displays the items and folders that have been created for the List. The list will display the following information:
- Attachments Indicator
- Title
Additional properties may be displayed as configured by the List developer.

The Items List.
Toolbar Functions
The Toolbar appears at the top of the List. It consists of the following functions:
- View Selector
- Allows you to change the selected View
- Add...
- Allows you to add a new item or folder to the List
- Delete...
- Deletes the selected items. A confirmation message will appear before deletion.
- Move...
- Moves the selected items to a different folder within the List.
- Data...
- Import Items
- Allows you to import items into the List
- Export Items
- Allows you to export items from the List into tab-delimited text file
- List Properties
- Provides access to the List configuration properties, including Columns, Views and more
- Only available to Users with the Essentials Administrator or Manage Custom Lists Permission
- View Lists
- Displays all of the available Lists
How to View a List Item
- Click on the Title of the item in the list whose information you would like to edit.
How to Add a New List Item
- Click the Add... button in the toolbar and then choose Item.
- Fill in the appropriate information on the Properties tab of the dialog.
- If Attachments have been enabled for the List, add any File Attachments to the record, if necessary.
- Click the Save button to create the new Record or click the Cancel button to abort the creation process.
- To save the new Record and then add a new record, click the Save and Add Another button.
- To save the new Record and automatically mark it as Approved, click the Save and Approve button.
- This is only enabled if Content Approval is enabled for the List.
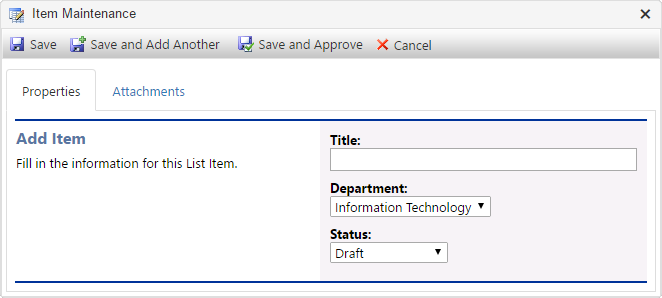
The Properties Tab of a sample Item Maintenance Dialog.
How to Edit a List Item
- In the Items List, select the Item to be edited by clicking the Title.
- Fill in the appropriate information on the Properties tab of the dialog.
- If Attachments have been enabled for the List, add any File Attachments to the Item, if necessary.
- You may also Remove any File Attachments by clicking the
 button next to the Attachment name.
 - Click the Save button to save the Item or click the Cancel button to abort the editing process.
- To save the new Item and automatically mark it as Approved, click the Save and Approve button.
- This is only enabled if Content Approval is enabled for the List.
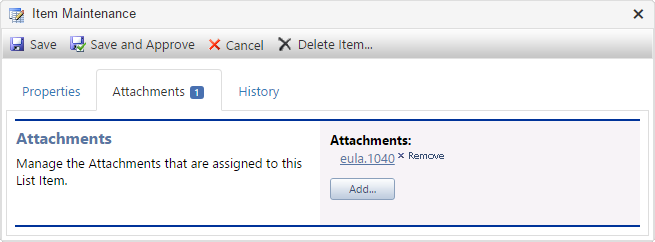
The Attachments Tab of a sample Item Maintenance Dialog.
How to View and Manage History for a List Item *
- In the Items List, select the record to be viewed by clicking the Title.
- Click the History tab of the dialog.
- The Version History of the Item will be displayed. Each entry displays the fields that were changed.
- To revert the Item back to a previous version, click the "Click here to Revert to this version" link.
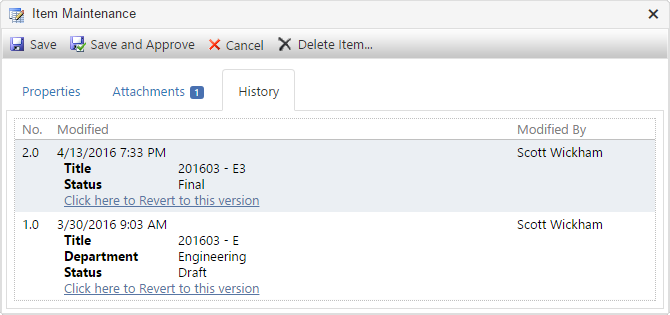
The History Tab of a sample Item Maintenance Dialog.
* Only available if Versioning is enabled on the List.
How to Move List Items *
- In the Items List, click the check box next to each Item and/or Folder that you want to move.
- Click the Move... button in the toolbar.
- In the Move Items dialog, select the Folder that you want to move the selected List Items to, then click the OK button to move the selected Items or click the Cancel button to abort the move process.
The selected Items and Folders will be moved to the desired Folder.

The Move Items Dialog.
* Only available if Folders exist in the List.
How to Import List Items
- In the Items List, navigate to the Folder that you'd like to import List Items into.
- Click the Data... button on the toolbar and choose Import Items.
- In the List Import dialog, select the tab-delimited text file from your file system that you'd like to import.
- The Data Import Specification will list the fields that are needed for importing data.
- For reference, click on the template-customlist.xlsx link to download the Data Import Specification (in Microsoft Excel format) for the List.
- As a guideline, you can add the records to the template-customlist tab of the spreadsheet, then save the workbook as a tab-delimited text file.
- Choose an Action for the Import:
- Choose Append Items if you want to add records from the file into the List
- Choose Replace Items if you want to delete the existing items from the current Folder in the List and replace them with the records from the file.
- Click the Import button to import the data into the current Folder in the List, or click the Cancel button to abort the Import process.
The selected Items will be imported into the List.

The List Item Import Dialog.
How to Export List Items
- In the Items List, click the Data... button on the toolbar and choose Export Items.
All of the Items in the List will be saved to a Microsoft Excel file and downloaded.
Deleting List Items
Deleting a List Item is a permanent change and cannot be reversed.
How to Delete a List Item
- In the Items List, select the Item to be deleted by clicking the Title.
- In the Item Maintenance dialog, click the Delete Item... button in the toolbar.
- In the confirmation message pop-up, click the OK button to permanently delete the selected Item or click the Cancel button to abort the deletion process.
The selected Item will be permanently deleted from iSite.
How to Delete Multiple List Items
- In the Items List, click the check box next to each record that you want to delete.
- Click the Delete... button in the toolbar.
- In the confirmation message pop-up, click the OK button to permanently delete the selected Items or click the Cancel button to abort the deletion process.
The selected Items will be permanently deleted from iSite.
Page ID:7059-5949-5510